
Disclaimer: this article includes links to products for sale on our store.
- Ledger Nano Set Up in Four Steps
- Setting Up a Wallet
- Sending Coins to the Nano
- Optional Steps to Do Next
- Conclusion
- FAQ
In this post we are going to cover:

Plus more... Read on to learn everything you need to know about how to setup Ledger Nano hardware wallet.
Ledger Nano Set Up in Four Steps
Before we can do literally anything of value with our Nano, we need to get it initialized and backed up.
Only then can we really use our Nano as a wallet.
So let’s get that set up process out of the way
Step One: Download and Install Ledger Live
To setup your Ledger Nano, the first thing to do is go to the Ledger Live download page on Ledger.com and download the software.
Select the Ledger Live version for your operating system.
The Ledger Live software is available on Windows, Mac, and Linux.
After downloading, install the software
Info: If connecting a Nano X to a mobile device, you will find the Ledger Live app for iOS on the apple app store and for Android on the google play store. Please note that this app is only for the Ledger Nano X, which has Bluetooth connectivity.
Open Ledger Live and select “Get Started”
Agree to the terms and conditions and then select “Enter Ledger App”
Select which Nano device you are setting up: Nano S, Nano S Plus, or Nano X.

Then Select the top right option “Set up a new Nano Device”

Scroll through the slides until you get to a screen that says “Let’s set up your Nano!” and select “Let’s do this!”
Next you’ll be taken to a screen that tells you to connect your Nano device to your computer.
Step 2: Connect Nano to Device
Plug the Nano into your computer’s USB port.

If you have a Nano X, you also have the option of pairing it with your smart phone.
The video below will show you how to do that.
Note: It is **not** currently possible to pair a Nano X over Bluetooth with a desktop computer. If you want to use Bluetooth, you must use your phone.
Move your attention the screen of your hardware wallet. Once plugged in, it will say “Welcome”
Next, you will receive on-screen instructions about how the buttons work.
The left and right buttons are useful for navigation and changing values. Pressing them both at the same time is a confirmation.
Once you go through this instruction phase, you will see a new message on the screen.
You want to click the right button until it reads, “Set up as a new device”.

Press both buttons to confirm.
Step 3: Create a PIN code for your Ledger Nano S
After the confirmation, you will receive a request to set a PIN code.

On the Ledger Nano devices, PIN codes are four to eight digits long.
To complete this step of the setup, you will have to use 8 numbers from 0 to 9. For example, ‘69865037’. It’s recommended to avoid any code that is common and easy to guess, such as ‘12345678’. At the same time, make sure you pick a code that you can remember.
DO NOT write this PIN code down. Commit it to memory. Anyone with this PIN code and your device can open the device and drain all the coins out of it.
You have been warned.
Now enter the PIN of your choice.

Confirm your PIN code
Confirm the PIN by entering the PIN again, and clicking confirm by scrolling to the check mark.
This step makes sure that you don’t set a faulty PIN that you won’t remember later. Nano devices are great because they even protect you against your own mistakes.
Step 4: Write down your recovery phrase
This is the most crucial part of the process. If the PIN code is the key to opening your device, then the recovery phrase is the key to your coins if you ever lose the device.
Pay extra attention to this step and make sure you write down every word as written on screen. If you ever lose your wallet, and you don’t have this phrase, you will lose all of your coins forever.
So keeping that in mind, let’s start…
Your Nano will now say “Write Down Your Recovery Phrase” and your Ledger Live software might require you to click an acknowledgment box saying that you understand if you lose this phrase, you will lose all your coins forever. Click that box and hit the “Recovery Phrase” button on the button right of Ledger Live.
On the Nano, scroll through the explanation by tapping the right button until you see the first word, labeled “Write Word #1”.

Write down the first word, then click the right button to show the second word.
Do this until you have written down all 24 words.

If you skip a word by mistake, you can return to it by pressing the left button.
After the 24th word, you will have to push both buttons at the same time to confirm and move to the next screen.
Very important: Make sure you also write down the number of each of the 24 words. Not only that it's important to understand the order of your recovery phrase – it will also help you in the next part.
Confirm your recovery phrase
In this section, you have to confirm the order of your 24 words, one by one. This is to confirm that you wrote them down correctly.
It will ask you for the first word, and you must scroll through the options until you see the first word you wrote down.
Once you have scrolled to the correct word, you press both buttons to confirm it.
You will do this for all 24 words.

If you get every word right, then you will receive the message “Your recovery phrase is set. Keep it in a secure place.”
If the Nano tells you there was a mistake, you will be brought back to the previous step to check the words again. Make sure you wrote them down correctly, and try to confirm again until you get success.
This step is the most time-consuming and annoying of of this setup, but it’s also an essential one.
If you have made any mistakes when you wrote down your recovery phrase, you want to figure that out now, instead of later on when you try to recover your coins.
Tip: Holding down the button on the Nano will scroll faster.
Moving on…
Tap the right button until you see “Press both buttons to continue”.
Press both buttons.
You will see a “Processing” animation, then “Your device is ready.”
Scroll right until you see “Go to the Dashboard”

Back to Ledger Live, click through the slides until you get to the “Hide Your Recovery Phrase Screen” and Select “OK, I’m done”.
Ledger Live is then going to ask you some annoying quiz questions to make sure you understand the importance of the recovery phrase.
Answer those right (I know, annoying), and it’s time for the next step.
Step 5: Check Your Nano is Genuine
Now, Ledger Live is going to make sure your device was not tampered with at some point between the time you bought it to the time it arrived at your door step.
Click “Check my Nano”.

Next, on your Nano device, it will ask you if you want to “Allow Ledger Manager”.
Click both buttons on the Nano at the same time to confirm.
The Ledger software will make sure that the device is genuine and has not been tampered with through a process called Root of Trust.
I explain more on that below in the supplemental material if you are interested.
Moving on…if the device is genuine, the Ledger Live app will tell you with this message:

Hit “Continue”.
Your Device is now set up!
Note: At some point in this process, Ledger Live will ask you to set a password for the software. Ledger changes when this step happens all the time, but I just wanted you to know what is is when they do.
This password has nothing to do with your on-device PIN, and it should be different from your PIN. The password has one job: to lock the desktop software when not in use. If you don't want anyone who uses your computer to be able to access your Ledger data, then set a strong password.
If you lose this password, you can do a reset to regain access. Ledger Live is a 'watch-only' software. It requires permissions from your hardware wallet each time you want to make transactions.
Now…to REALLY use the device, we need to do more. We need to set up an individual wallet and send coins to it.
That is covered next….
Setting Up a Wallet
Wallets for different coins on Ledger Live are created by installing “apps” on your device via Ledger Live.
For instance, if you want to hold Bitcoin on your Nano, you install the Bitcoin app. If you want to hold Ethereum, you install the Ethereum app.
For this explanation, we will use Bitcoin as our example, since that is the most common. However, this process will be the same for every coin that your Nano supports.
In Ledger Live, on the left hand menu, select “Accounts”

Then on the top right, select “Add Account”

Now, select Bitcoin (or whatever crypto you are going to send to your Nano), and select “Continue”.

The App will begin installing.

After it is installed, you will be asked to open the app on the Nano. Scroll to it using the buttons and then tap both of them at the same time.
It will initialize then app, then ask you to name the account for that app.

You can have multiple different “accounts” for different pools of that coin. This is purely for your own organization and how you want to spend it. Think of it like different accounts at a bank. It’s all one big pile of money, but you separate them into savings and checking based on your needs.
Now hit “Add Account” and then “Done”
You now have a Bitcoin wallet on your Nano.
Let’s send some coins to that wallet now.
Sending Coins to the Nano
This is a topic that isn’t easy to show off since there are so many places you can send coins from so they end up on your Nano.
That said, the process is usually the same no matter what.
Because of that, I recommend you check out my other article on how to send coins from Coinbase to a Ledger Nano (linked below).
A little context will help though:
Think of the walkthrough in that guide as an example where you want to send coins from your Coinbase exchange account to your Nano S. Whether or not that is actually what you are doing, the process of sending coins from anywhere to a Nano hardware wallet are almost always the same.
First, you create a receive address in Ledger Live for the account you want to send coins to.
Second, if you are sending from another wallet, you open the send option. If you are sending from an exchange account (like Coinbase), you look for an option called “withdraw” or “send” or something similar to that.
Third, you input the receive address as the destination where the coins should be sent from step 2.
And you send them.
It is almost always that simple, but if that was confusing, the Coinbase to Ledger guide below really shows it in much greater detail. I just don’t want this guide to get too long.
Read More: How to Send Coins From Coinbase to Ledger Nano
One small point to note: it is sometimes confusing for new users if the Nano should be unlocked before or after you begin creating the transaction in Ledger Live.
In my experience, it is best to unlock Nano, then create the receive address in Ledger Live, then open the app on the Nano once Ledger Live instructs you to do so.
Optional Steps to Do Next
We have now covered all of the basics, but before I conclude, I want to talk about a couple of other features you might want to consider when setting up your Nano hardware wallet.
Backup Your Passphrase in Steel
As you now know, Ledger Nano devices allow you to backup your hardware wallet using a standard known as BIP39. In short, your private key is converted into an easily readable series of 24 words.
Read More: How Seed Phrases Work
And we also now know that if you Nano is ever lost, stolen, or destroyed (or you forget your PIN), you will need those 24 words to get your coins back.
Ledger provides a couple of pieces of paper to write down this series of words during device setup.

However, backing up your Ledger in this way is not very safe.
If the location of this piece of paper ever got flooded or caught on fire, you’d be out of luck.

One Billfodl customer had over $1,000,000 of Bitcoin backed up on a notebook in a fireproof safe, but when his garage flooded with 6 feet of rain, the safe became water-logged, and he lost everything.
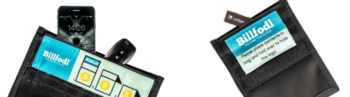
This is why many people choose to use a device called a Billfodl to store this series of words on pieces of stainless steel, impervious to fire and flood.
Passphrase Support
Ledger Nano wallets also support passphrases (aka ‘25th word protection’).
This is not to be confused with ‘recovery phrases’, and this topic is covered in much greater detail in our Ultimate Wallet Backup Guide if you want to learn more, but I will briefly cover the basics here as well.
Read More: Ultimate Wallet Backup Guide
The ‘25th word’ passphrase allows the user to add an additional word of his choosing to the 24 word recovery phrase.
Why would you do this? There are a couple of reasons:
1. Added Backup Security
You might add a 25th word if you want to add extra security to your recovery phrase in case someone finds your 24 words.
Remember: Anyone with your 24 words can recover your coins and take them. Adding another word of your choosing means they will need to know the word you chose as well as the 24 words.
2. Dummy Accounts
Another reason to add a 25th word is to create a “dummy account” in your device that holds a small amount of coins. This protects you from what is called a “$5 Wrench Attack”.
How a $5 wrench attack works

If someone physically attacks you to get you to open your wallet and transfer your coins to theirs, you can show them a different wallet holding a tiny amount of crypto so they think you don’t have much.
They may take this tiny sum of crypto and then move on, leaving you with most of your holdings in tact.
That said, if you forget your 25th word and need to recover your wallet, you are screwed. So keep that in mind when deciding whether or not to use this feature.
Multi-signature Support
Some advanced crypto investors use more than one hardware wallet to sign transactions.
This protects the investor because it means that even if someone gains access to one of your hardware wallets (or finds a vulnerability in its software), they still need an additional hardware wallet to access your coins.
Ledger Nano S can be used as one of these devices, which makes it more appealing than hardware wallets that can’t be used in a multi-signature style cold storage.
One easy way to set up multisig using a Ledger Nano S is to pair it with the Blockstream Green software wallet.

Full Node Support
Running full Bitcoin nodes and pairing them with hardware wallets is a very large topic worth its own article.
We are working on that article right now, in fact.
Once we are done with that, we will put a link to it here.
I just wanted you to know that if you are running a full node, it is possible to verify your transactions on your Nano device with it natively via Ledger Live.
Here is a great guide from Ledger on how to set that up.
If you don’t want to use Ledger Live, and you’ve already got your full node connected to Electrum, you can also use the Nano there as well.
Conclusion
That really covers it all.
I know this got a little long, and if you’ve come this far, you are a real trooper.
I hope you got some value out of this, but if you have more questions, reach out to support@privacypros.io. We are happy to answer any questions you have, free of charge.
FAQ
How does the Ledger work?
Ledger Nano S works works pretty like any hardware wallet. First, you plug it into your computer, set it up, then you choose a PIN code to protect the device from unwanted access. Then you will receive a 24-word seed phrase whici is your private key.
Is Ledger Live Safe?
Ledger Nano S and Ledger Nano X use the Secure Element (the most secure chip to protect you from attacks). Both devices keep your private key secure and will remain safe from online hacks.
How do I know if my Ledger Nano S is genuine?
You have to make sure that your device was not preconfigured with a PIN code that you did not choose yourself. When you turn it on for the first time, the device should display ‘Welcome to Ledger Nano S’.
What happens if Ledger Nano S breaks?
You should order a replacement and use your recovery seed phrases into your new device.
Can you use Ledger Nano S on multiple computers?
Yes, you can install Ledger Live application on multiple devices (computers, smartphones), taking into consideration that you need to set up your accounts and settings on each of these devices.
Is Ledger Nano S a cold wallet?
Yes, Ledger Nano S is a cold wallet that can store Bitcoin, Ethereum and other supported coins.
How many coins can Ledger Nano S hold?
Ledger Nano S supports 26 coins and more than 1500 tokens.
Does Ledger Nano S have a battery?
No, it doesn’t have a battery. It is automatically turned on when it is plugged into a power source (computer or wallet).