Disclaimer: this article includes links to products for sale on our store.
- Introduction
- 1. Use a Strong Master Password You can Remember
- 2. Add a Yubikey for Two Factor Authentication
- 3. Add a Second Yubikey as a Backup
- 4. Disable SMS two Factor
- 5. Don’t Reuse Your Master Password Elsewhere
- 6. Don’t Save Your Master Password Anywhere
- 7. Use a VPN if Logging On in Public
- 8. Set Up Reprompts for Master Password
- 9. Set Up Account Activity Notifications
- 10. Restrict Mobile Access
- 11.Take the LastPass Security Challenge
- 12. Hide LastPass Activity with Secret Email Address
- 13. Disable Logins from Unknown Devices
- 14. Set Automatic Logouts
- 15. Use One-Time Passwords
- 16. Increase Password Iterations
- 17. Use LastPass Portable
- 18. Disable Logins from Specific Locations
- 19. Disable Logins Over Tor
- 20. Use the Screen Keyboard
- 21. Uncheck Remember Email and Password
- 22. Disable Master Password Reminder
- 23. Enable TouchID or FaceID (or PIN) on Phone
- 24. Set Lock Options to “Immediately”
- 25. Set Clear Clipboard to 30 Seconds
- 26. Set Default Search Engine to Start Page
- Conclusion
- FAQ
In this post we are going to cover:

Plus more... Read on to learn everything you need to know about LastPass security.
Introduction

You set up a LastPass account because you take your online data seriously. You know that reusing passwords is a horrible idea. Each account should have a totally unique password. And no one should know that password - not even you.
So how can you take Lastpass security to the next level? We are going to show you 26 ways to do this, each with a step-by-step outline.
1. Use a Strong Master Password You can Remember
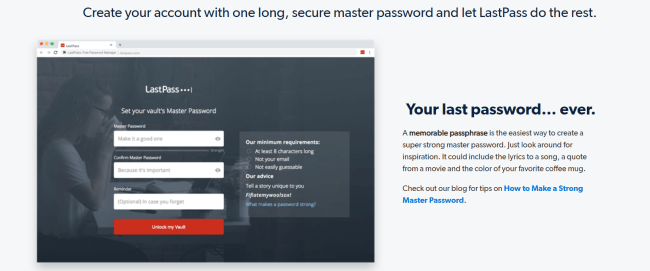
Lastpass forces you to make a master password when you create your account. Because your Master Password is essentially a password for all other passwords, it is best to make it very strong. As you have a password manager, the only password you need to remember is this one.
How to Set Up a Strong Password That is Easy to Remember
There are some great tips for making strong passwords that are easy to remember.
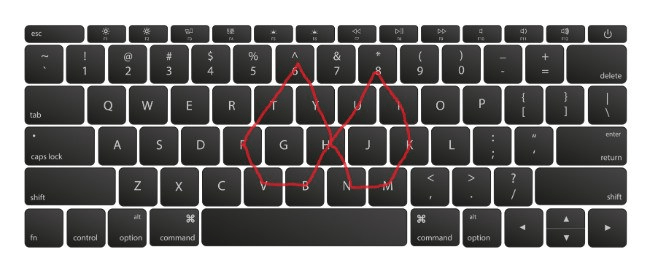
Treating your keyboard like a constellation.
You create a shape on your keyboard and use the keys to draw it. For instance, ‘fvbhu8ikmnhy^tf’ creates a figure-eight shape.
Create a sentence using a quote
Are you a fan of the Beatles? Then try this:
Yesterday, all my troubles seemed so far away / Now it looks as though they’re here to stay / Oh, I believe in yesterday
which in password form converts to
Y,amtssfaNilatth2s/O,Ibiy
- ‘Y,amtssfa/Nilatt’h2s/O,Ibiy’, and ‘fvbhu8ikmnhy^tf’ are both very strong passwords. And they are quite easy to remember. Using these tricks is a great way of creating a strong Master Password for your LastPass account.
2. Add a Yubikey for Two Factor Authentication
Yubikeys are one of the most important security measures you can add to your LastPass account. You should add a Yubikey to every online account that will let you.
What is a Yubikey?
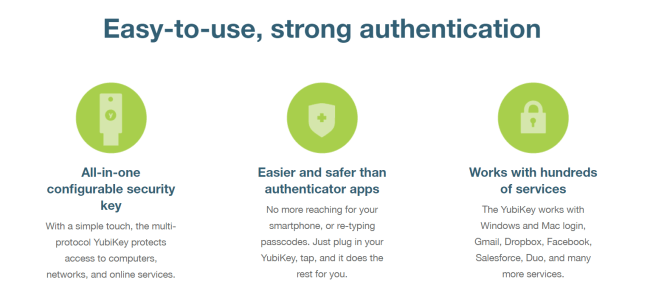
A yubikey is known as a hardware authenticator or USB security key. Yubikey does the same thing authenticator apps, such as Google Authenticator does. Instead of providing a series of six digits when you log in to an account, you insert a thumb drive in your device and press a button.
You can see what that request looks like here:
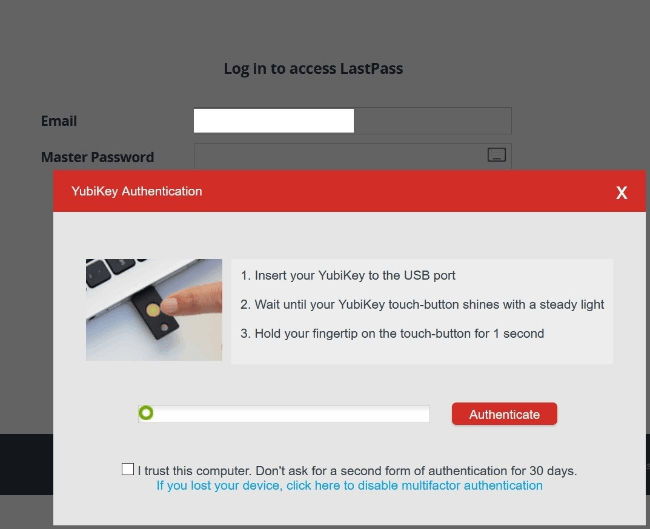
This is why it is called a hardware authenticator. You actually need the device on you to log in to your account. This makes it impossible for someone to log in to your account unless they have your Yubikey.
You can grab a Yubikey here.
How to Set Up Yubikey on Your LastPass Account:
Login to your account on lastpass.com on a browser (not the plugin for chrome or firefox). Once logged in, Go to Account Settings on the button left-hand side.

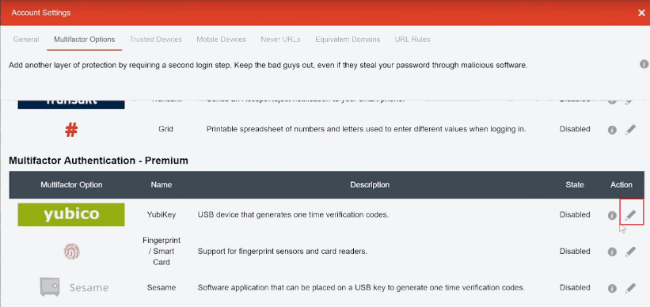
A window will appear. Select the second tab called “Multifactor Options”. Scroll down until you see a section called “Multifactor Authentication - Premium”. You should see an option for Yubico. That is the company that makes Yubikeys.
Now select the Pencil icon to edit it.
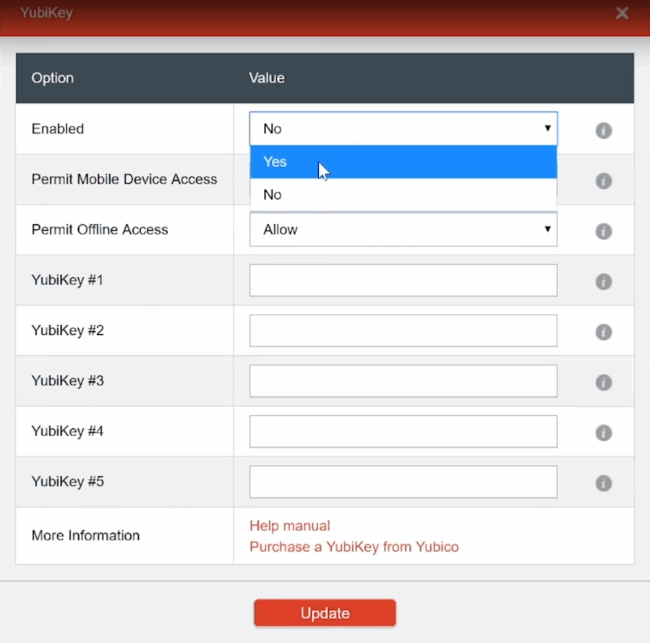
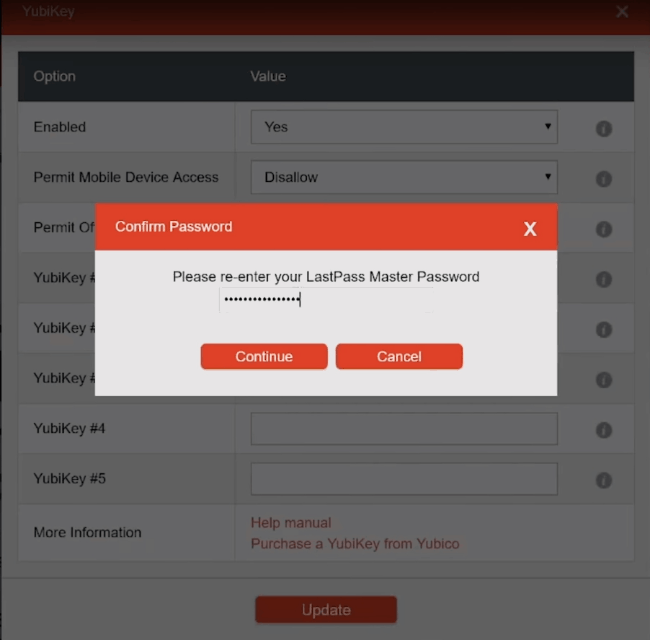
A new window will appear. Select the “enabled” dropdown and select “Yes”. Then select the box next to “Yubikey #1”
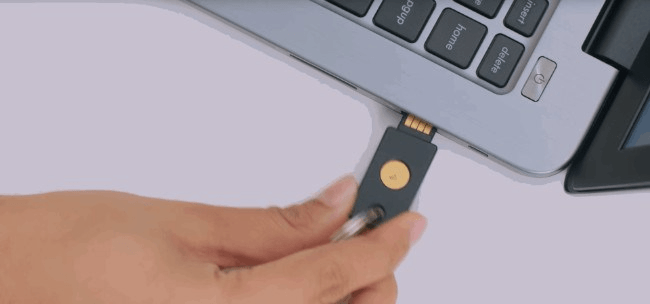
Insert your yubikey into a USB port on your computer.
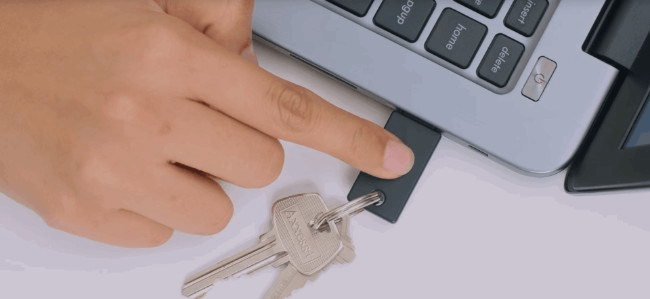
Hold down the gold button on your yubikey until it fills up the text box.
Once finished, click Update.
Now enter your master password to confirm the change.
You can also set up your yubikey to be your second-factor authentication on your iOS and Android devices.
You can follow these instruction in the video bellow.
3. Add a Second Yubikey as a Backup

This is just a quick add-on to the previous tip.
Advice: We recommend buying two yubikeys. Since you need your yubikey to access your account on your devices, you may want more than one. This second Yubikey acts as a backup.
But there are other advantages. We like to keep one on our keyring for when we are on the go, but use the second backup at our desk. This allows us to keep it plugged into our computer, which is much more convenient.
4. Disable SMS two Factor
Now that you have a Yubikey set up for two-factor, you can disable the SMS two-factor. SMS two-factor is dangerous because it is easy for hackers to hijack your text messages via “SIM swapping”.
The Federal Trade Commission explains it well.
(The scammer) may call your cell phone service provider and say your phone was lost or damaged. Then they ask the provider to activate a new SIM card connected to your phone number on a new phone — a phone they own.
If your provider believes the bogus story and activates the new SIM card, the scammer — not you — will get all your text messages, calls, and data on the new phone.
Info: The FTC also provides some great advice for protecting yourself further. Add a PIN code to your cellular phone account and limit the personal info your share online.
But the best way to mitigate the damage is to turn off SMS two-factor on all your accounts (that is if alternatives exist). It’s best to use Yubikey if supported. If not, use an authenticator app on your phone, such as LastPass’s Authenticator app.
How to disable SMS two-factor on LastPass:
Go into account settings:

Select the second tab called “Multifactor Options”

Now set up any other option as your second factor and the SMS messages should stop.
Again, our favorite it to set up a Yubikey as it is by far the most secure option available.
How to disable SMS Account Recovery on LastPass:
While you are here, you should go ahead and disable SMS account recovery as well, if it is set up.
In Account Settings, go to the “General” tab (the first tab).
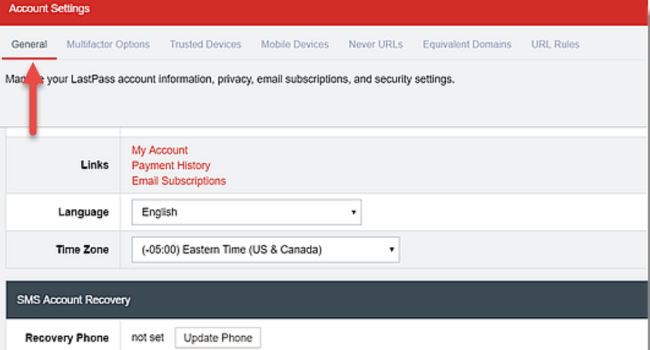
Scroll down to the very bottom, and you will see a section called “SMS account recovery”.
Disable this method. A better option is to set up your Yubikey or authenticator app as a second factor on your email account. Then create a new strong password that you can memorize for your email account.
5. Don’t Reuse Your Master Password Elsewhere
Warning: This should go without saying, but we'll say it anyway: DO NOT USE YOUR MASTER PASSWORD FOR LastPass ANYWHERE ELSE!
The whole point of using LastPass in the first place is so you don’t need to re-use passwords ever. You should let LastPass generate passwords randomly for all your other online accounts.
Warning: However, if you are going to re-use passwords, the last one you should ever re-use is your LastPass master password. If that password ever gets leaked by a 3rd party, attackers could try to use it on your LastPass account. They would then have access to all your passwords.
Don’t re-use your LastPass account password. Ever.
6. Don’t Save Your Master Password Anywhere
On a related note, don’t write down your master password on any electronic. This is especially true if that device ever connects to the internet.
We get it: LastPass has made it clear that they do not know your Master Password, so there is no way for them to recover it if you forget it.

This is why you should always choose a strong password that you can remember. See our section above about how to do that.
If you feel you must write down your master password, store it off the computer on pen and paper.
Better yet, use a Billfodl backup device to store it on stainless steel.
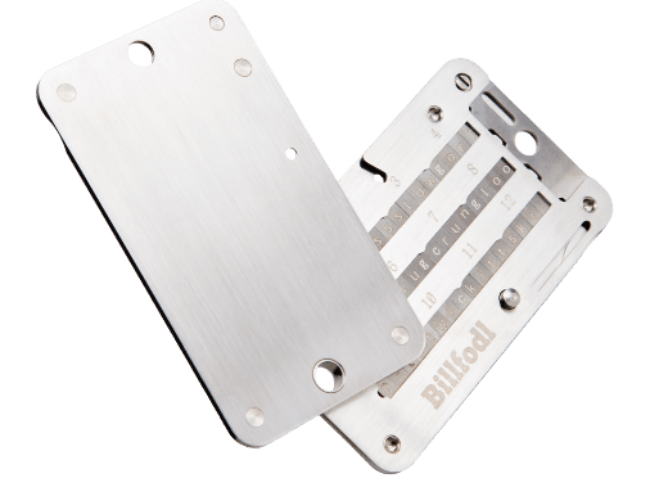
If your house ever catches on fire or gets flooded, your password will survive.
7. Use a VPN if Logging On in Public
It is usually a good idea to avoid using public WiFi. You have no idea if the network is compromised and someone can watch everything you are doing. But sometimes we have no choice but to use it.
This can be especially dangerous if you have to log in to sensitive accounts using public WiFi. And no account is more sensitive than our LastPass account. It stores all our other passwords, after all.
Enterprise cybersecurity firm CSO put it best:
One of the biggest threats with free WiFi is the ability for hackers to position themselves between you and the connection point. So, instead of talking directly with the hotspot, you end up sending your information to the hacker.
The hacker also has access to every piece of information you send out — emails, phone numbers, credit card information, business data, the list goes on. And once a hacker has that information, you’ve basically given them the keys to the kingdom.
If you must use public WiFi, and you must log in to LastPass, then do it while connected to a VPN. A VPN allows you some nice privacy and security features in this situation.
Most important among them is an encrypted connection. Anyone who is eavesdropping on the local network will not be able to see your communication with LastPass. This means that your account should remain secure even if the network isn’t.
8. Set Up Reprompts for Master Password
Reprompts force LastPass to require the entry of your master password for different actions. For instance, if a setting in your LastPass account changes, a re-prompt would force you to input your master password again to confirm the change.
Select Account Settings:

Select “Show Advanced Settings”
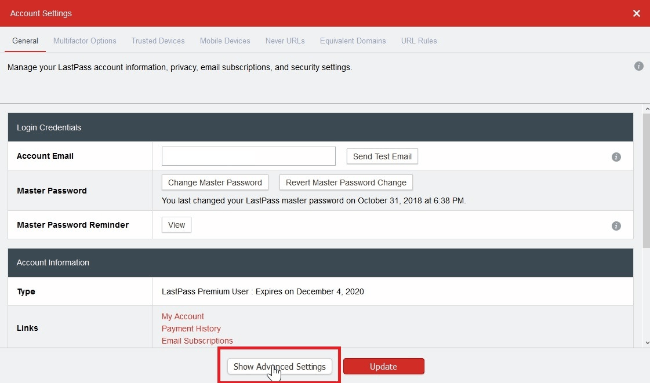
Scroll down to “Alerts” and look for “Re-prompt for Master Password.

There are multiple options here, and which ones you choose will depend on how intrusive you want LastPass to be. The most secure choice is to select all of them (as I have). If you choose to do the same, be prepared to enter your master password A LOT.
If you want a less annoying experience, you may be willing to forgot a little account security. It’s really up to you.
If you only want this level of security on specific sites, you can also set that up. Here’s how:
Click the LastPass extension or plugin on your browser (Firefox or Chrome). Search for the account you want to set up re-prompts on. Click the Pencil icon to edit this card.

On the account card, toggle down “Advanced Settings” and tick the box next to “Require Password Reprompt”

And you are all done. Now you can customize master password input requirements however you want them.
9. Set Up Account Activity Notifications
If someone ever attempts to log in to your LastPass account, you will want to know about it.
And there is a way to set up notifications so you always know if someone is trying to attack you.
How to Set Up Activity Notifications in LastPass:
Open “Account Settings”

You will be in the “General” tab (the first tab). Scroll down until you see a “Links” row under “Account Information”, and select “Email Subscriptions”

Tick all the site notification boxes. Then tick the box that says you don’t want to receive promo emails from LastPass (if you don’t want spam email from them).

Now click “Update”.
You will now receive emails anytime a major activity happens on your account…whether you did it or not.
10. Restrict Mobile Access
You may want to add extra protection to your LastPass account by restricting new mobile devices from being added to the account.
This stops attackers from adding their own devices to your account if they find your username and master password.
How to Restrict Mobile Devices from Your LastPass Account:
Open “Account Settings”

Select the “Mobile Devices” tab and select “Enable” at the bottom.
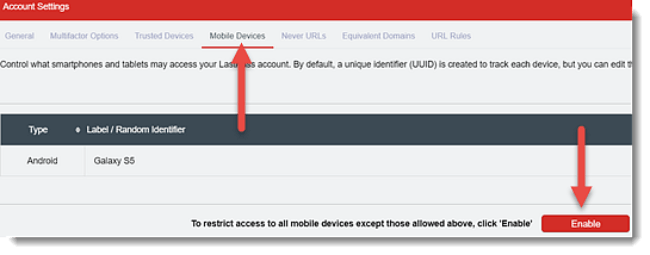
This option tells LastPass that it should only give account access to devices that you approve on this screen. If this option were disabled, anyone with your username and password could download Lastpass and login to your account.
Now that you have enabled this option, you will need to approve any new devices on this page. If you want to add a new mobile device of your own, this is how you will do it.
Warning: What if you see a device you do not recognize trying to gain access? Deny it!
How to Deny an Authorization for a Mobile Device in LastPass
Un the “Access” column next to the device you do not recognize, hit the dropdown. Select “Denied”
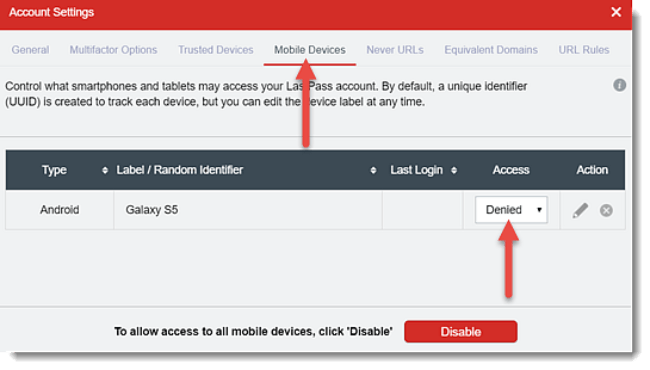
You will then be asked to confirm if you want to end any current sessions. Select Yes.

This will also log you out of LastPass. Do not be alarmed. This does not mean you have kicked yourself out of your account. LastPass is just being cautious and ending everyone’s session. You can now just log back in.
11.Take the LastPass Security Challenge
LastPass has created a checklist for you to run through that will help maximize the security of your account.
You can find that checklist by heading to the “Security Challenge” tab just above “Account Settings”.
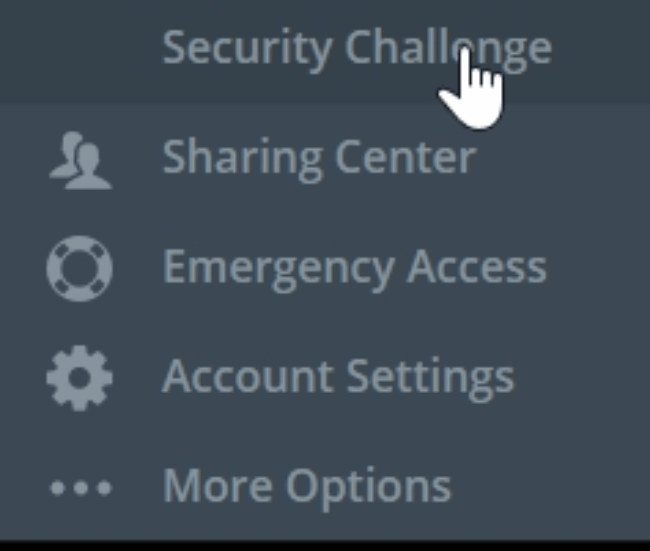
A few of the items on that list will be similar to the ones you did here. But we have added many more, so this task may not be necessary.
12. Hide LastPass Activity with Secret Email Address
To hide your important information, LastPass enables you to set up a secret email address. A separate email will serve for this activity. The LastPass info will not be on your primary email, preventing leaks and hacks.
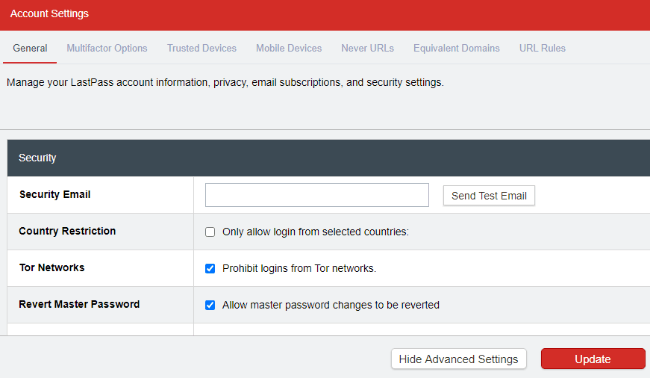
To set up a secret email, log in to your LastPass account, go to the Security menu and find the Settings. Here you’ll see the security email bar where you can enter the secret email address. Click on the test email to confirm everything is set up properly and you are all set.
13. Disable Logins from Unknown Devices
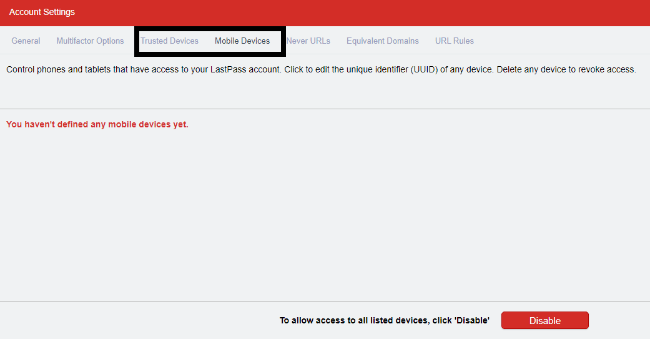
This feature helps you protect your information from unidentified access locations. To enable this service, you need to log in to your LastPass account > go to the Account Settings > Devices. Here you will see a list from all the devices you have used your LastPass account with. You can enable/disable what devices get access to your LastPass account.
14. Set Automatic Logouts
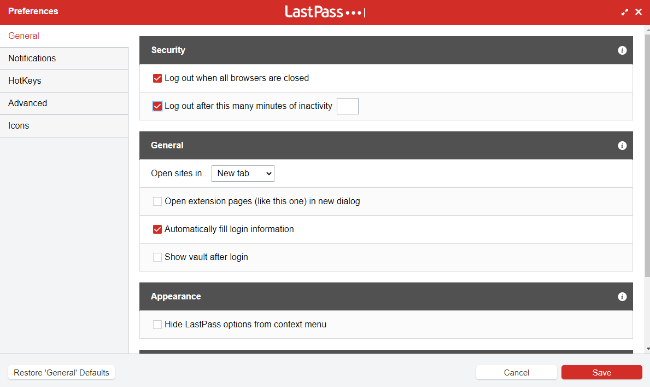
The automatic logout is useful when working on a device where there is a chance of other people using it. To enable this function, access the LastPass extension in your browser > Preferences > General. Check the box “Log Out when all browsers are closed”. Also, check “Log out after this many minutes of inactivity (minutes)”. Then save the changes and restart your browser for the changes to take effect.
15. Use One-Time Passwords
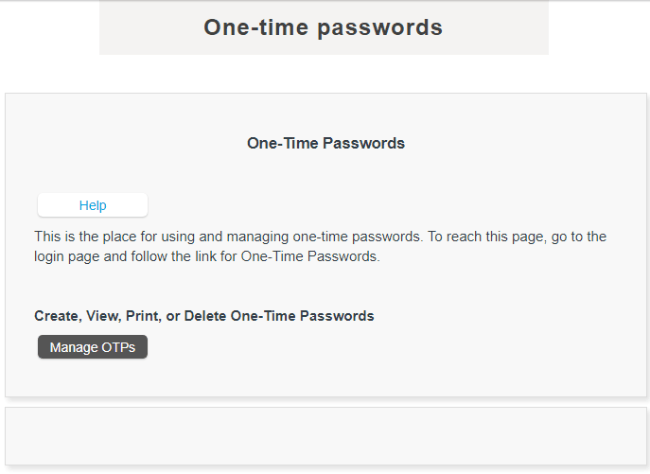
The OTP or one-time password works like a throwaway password. It is handy when using a device that you don’t trust. We mean a public computer in an internet cafe or a library or even someone else’s computer. The OTP also prevents someone else from stealing your master password via keylogging.
There is a separate page in the LastPass menu where you get to generate as many OTPs as you need. Print them out and use them when logging from a non-trusted device.
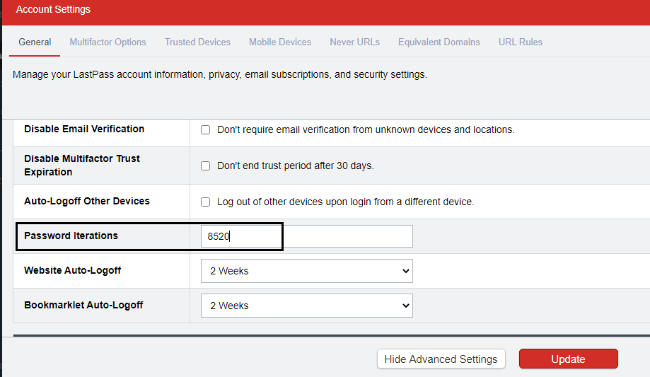
16. Increase Password Iterations
Password iterations point to the time LastPass needs to determine if your password is correct. There is a recommendation for this value to be set at 5000 or more. But you need to note that the higher the value, the longer the login will take.
To set password iterations: Account Settings > General > Show advanced settings > Security. Scroll down in the list and you will see the password iterations and you can change this number.
17. Use LastPass Portable
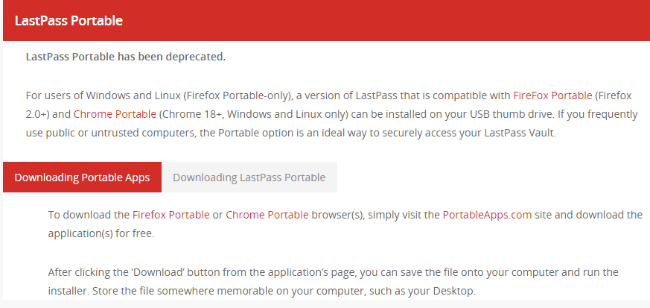
The LastPass Portable is useful when traveling and using computers you do not trust. To use the Lastpass services, get the LastPass Portable app, and install it on your thumb drive. It is compatible with Firefox Portable and Chrome Portable. With it, you always have access to your LastPass Vault.
18. Disable Logins from Specific Locations
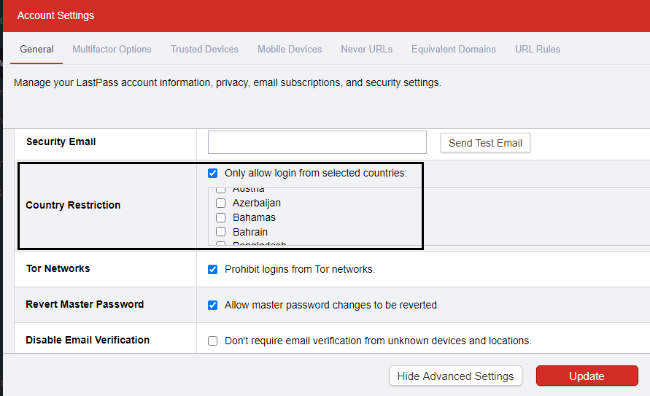
LastPass provides you with the option to set up a country-specific login. This way your account can be accessed only from the allowed countries. The list of countries is in the Settings > General > Show Advanced Settings.
Click the “Only allow access from selected countries” and check the countries you want. As always, click on the Update button to save the changes and you are all set.
19. Disable Logins Over Tor
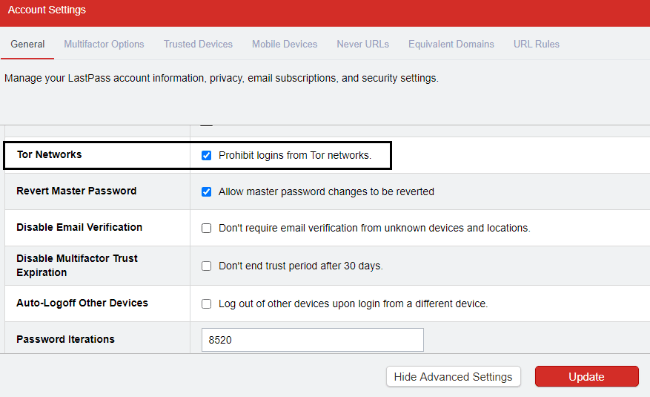
The Onion Router is a complex network where the traffic is relayed a lot of times. No matter how secure this may seem, it is also the favored channel for hackers and other online attackers.
To prevent login from Tor, go to Account Settings > General > Show Advanced settings. In the list, you’ll see the Tor Networks box. Uncheck the box and you will not be able to log in to your LastPass Vault from the Tor network.
20. Use the Screen Keyboard
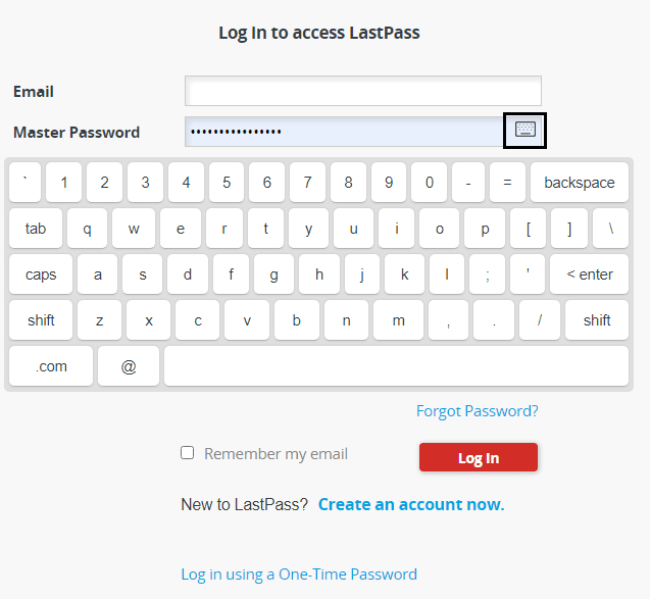
A Keylogger works by capturing keyboard clicks but is unable to capture mouse clicks. When using a computer you do not trust, you can use the virtual keyboard provided by LastPass.
You can enter your email and Master Password without ever having to touch the keyboard. You are not giving a keylogger a chance to log in to the characters in your email and password.
When logging in to your LastPass account, you’ll see a small keyboard sign next to the password bar. Click on it and a virtual keyboard will be shown that you use with your mouse.
21. Uncheck Remember Email and Password
This is pretty self-explanatory. Every time you log in to your account from an untrusted device, make sure to uncheck “Remember Email and Password”. Note that this option is disabled when logging into an account from an untrusted device.

22. Disable Master Password Reminder
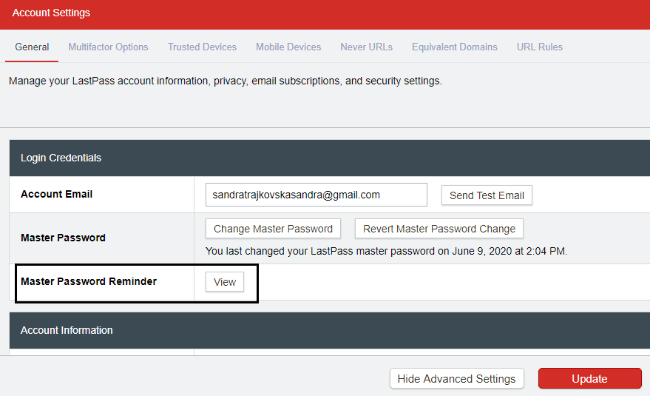
The Master Password Reminder is a hint that will remind you of your Master Password. LastPass DOES NOT remember your Master Password.
So you need a way of remembering your Master Password. Log in to your LastPass account > General settings > Login Credentials. You will see the Mater Password Reminder option and you can click on the View button to see what you’ve entered. By disabling it, there is nothing that could point an attacker to your Master Password.
23. Enable TouchID or FaceID (or PIN) on Phone
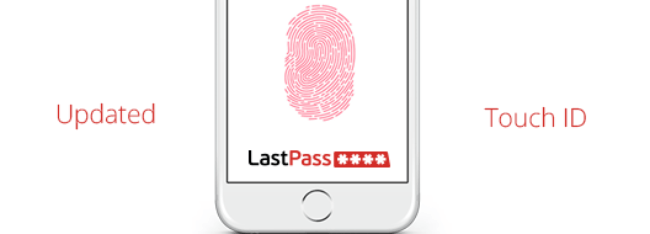
Instead of entering your Master Password, LastPass allows you to use your face as a password. It may sound high-tech and impossible, but it is accessible for iOS users. To set up a TouchID, you need to log in to your LastPass app with your standard username and Master Password.

If you are logging in for the first time, you will be prompted to use the TouchID and you can set it right on login. The Home button on your iPhone acts as a scanner and you need to touch it to get your fingerprint scanned. When the scan finishes, you are all set and next time you can log in to your LastPass with your fingerprint.
The FaceID is available for users of iPhone X. This phone has a smart 3D camera that captures a map of your face. This image is then used instead of a Master Password. To use it, you need to open the LastPass app on your iPhone X, look at the camera and you’ll be logged in to your account.
24. Set Lock Options to “Immediately”
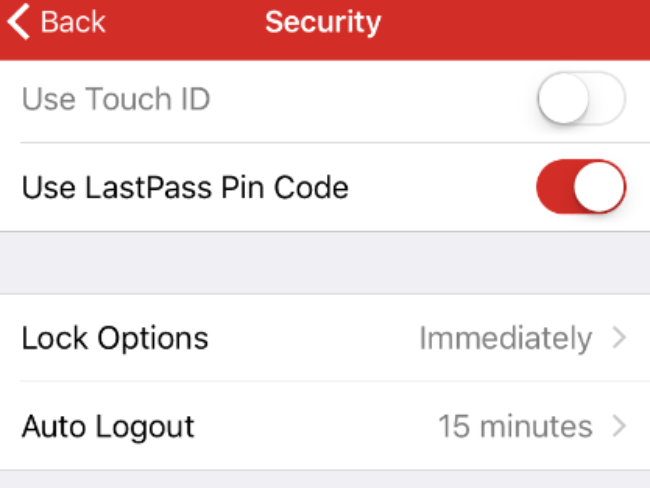
When not in use, the LastPass app locks up after a set amount of time. For the best effect, you need to set the lock time to “Immediately”. When you are inactive on your Lastpass account, it will instantly get locked.
To get access, you’ll need to enter your Master Password. To do this, go to the Account Settings > Show Advanced Settings > Security > Lock Options. Set the toggle switch to immediately and you are all set.
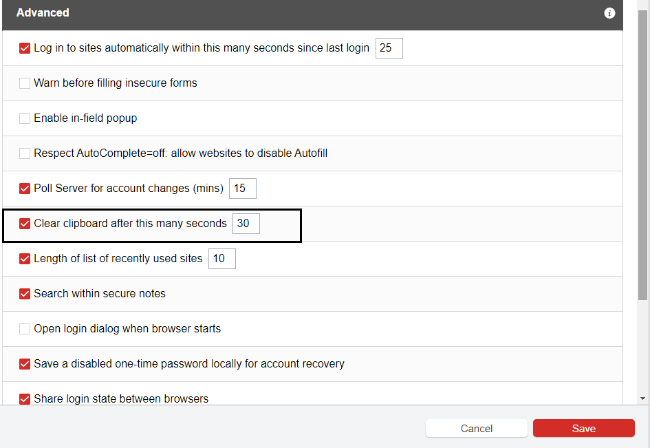
25. Set Clear Clipboard to 30 Seconds
The LastPass clipboard clears after a set amount of time. This is done to protect your sensitive data when copying and pasting it on online forms. To protect your data, set the Clear Clipboard to a short time like 30 seconds. This will give you enough time to copy and paste your data where you need it.
To do this, first, install the binary component in your app, and then going to the Account Options > Advanced. Check the box “Clear Clipboard after use (seconds)” and set the time to 30 seconds.
26. Set Default Search Engine to Start Page
Set your default search engine to share the login between all the browsers where the plugin is. For this option, open the Preferences > Advanced and see which is the Default Search Engine.
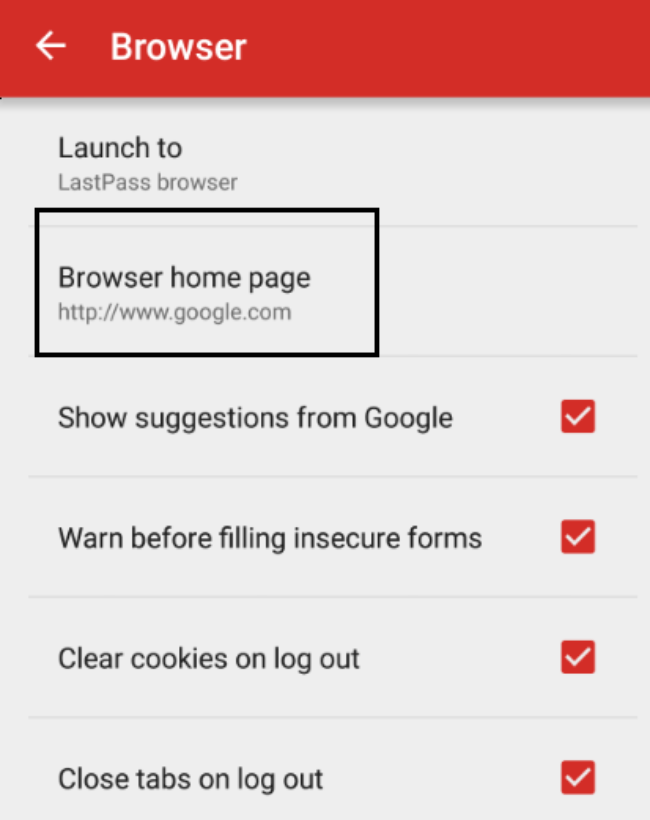
Link to start page about us.
Conclusion
LastPass does everything in their power to ensure your passwords are well protected. The only weak link in the actual user of the LastPass services. To be safe, you should follow our suggestions outlined above. Of course, create a strong Master Password.
Only then you can save yourself the headaches of remembering a lot of passwords. Freely go about your life while LastPass takes care of your sensitive info.
FAQ
What is LastPass used for?
LastPass is a password manager that stores all your passwords in one place. This is called a Vault through which LastPass remembers your password for you.
How does LastPass work?
LastPass is like a notebook to save your passwords. LastPass uses a security key - master password, which only you know and it encrypts all your passwords and secure info on your device.
How can you make LassPass more secure?
You can make your LastPass more secure by using a Yubikey. A Yubikey is known as a hardware authenticator or USB security key.
Why is SMS two-factor dangerous?
SMS two-factor is dangerous because it is easy for hackers to hijack your text messages via ‘SIM swapping’.
Where should I save my master password?
Obviously, you shoudn’t save it on any electronics that are connected to the internet. Consider using a Billfodl backup device to store it on stainless steel.
Should I log in to LastPass when using public WiFi?
If you must use public WiFi, and you must log in to LastPass, then do it while connected to a VPN. A VPN allows you some nice privacy and security features in this situation.
Why is LastPass Portable useful?
The LastPass Portable is useful when traveling and using computers you do not trust. To use the Lastpass services, get the LastPass Portable app, and install it on your thumb drive. It is compatible with Firefox Portable and Chrome Portable. With it, you always have access to your LastPass Vault.
Does LastPass allow to use your face as a password?
LastPass allows you to use your face as a password. It may sound high-tech and impossible, but it is accessible for iOS users. To set up a TouchID, you need to log in to your LastPass app with your standard username and Master Password.


